There is no getting around it, my sleeping bag is a heavy object in my pack. It also needs replaced as it isn't warm when the frost starts. I hiked 10 August days in the Sierras as a 17 year old and every day I looked at the dinky little key chain thermometer as I got up and each time it read 32°F. This experience has given me this quirk: I think a sleeping bag must be warm enough to spend a night comfortably when the water is thinking about freezing. The current bag doesn't do that. Saving some weight and going to a backpacking quilt is attractive to me because there doesn't seem to be a lot of temperature range between too cold to sleep under the bag and too cold with the bag. Your quilt enthusiast will also point out that all the insulation that you are crushing underneath as you sleep isn't helping any and is therefore extra weight. This is only mostly true for synthetic bags, and going to a quilt may require a warmer mat. The sleeping bag can also be more reliably closed against the elements, which will give it a few more degrees warmth, but a quilt can be well closed if you do it right.
The insulation material to have seems to be Climashield APEX or Primaloft. The first seems to be ever so slightly warmer and needs no quilting other than at the edges, vastly reducing the effort required. Pick it and there are a few simple patterns, like the Sin50or this Primaloft quilt, to make these. Basically, cut two pieces of nylon and some insulation to the desired size, stack them up so the right sides of the fabric are together and the insulation is on top, then sew around 3 sides. Turn it right side out and finish the bottom and add some embellishments. It is a really good idea to mock up the quilt first and see if it fits around you the way you want it to. They tend to come out too small otherwise. I decided to add 4" to the length on mine after mocking it up.
I see one big problem with the common design. When I get cold, I will naturally try to pull it as tightly around as I can get. This will pull the inside against me and, because the inside and the outside are the same size, pull the outside tight around me squeezing the insulation. So when it gets coldest, I will naturally make it even colder. No one actually complains about this, but in the spirit of, "If it ain't broke, fix it anyway," I did for my design by adding darts to the outside piece so that the edges are the same length as the inside piece.
I made one with cheap nylon and taffeta and queen sized quilting batting to see if the darting would be effective and try a few experiments with fastenings. It was nice and roomy and worked well after a couple iterations with those fastenings. So it was time for the real deal. This is (though not to scale) what I worked out for my just shy of 5'7" frame (including 1" seams):
Inside quilt piece. Top to the left.
Outside quilt piece. Top to the left.
The top is the inside piece, cut from 3 yards of 60" wide black uncoated nylon. I plotted it out with an 8' t-square and straight edge and some basic math, then used a soldering gun for the cuts. I then plotted out the outside piece (bottom) which is wider and has two jogs in the diagonal that would otherwise be the same as the inside piece. When the darts are sewn, this piece has the same perimeter as the inside piece. This is out of 3 yards of 58" wide bright yellow breathable, water resistant nylon. For colors, the philosophy is that because black is good at absorbing and radiating heat, it is useful to have some of it to help drying, but on the outside it would radiate away the heat you want to keep, so place black on the inside and something light on the outside. I think that in practice, this radiation is minuscule while the actual surface that is most likely to get wet is the outside. There is certainly an argument for all black and my yellow doesn't dry quickly after a heavy dew.
Now cut out strips from the outside piece scraps for draw cord tubes at the top and bottom. For the top, they should be 2.5" wide and one at 27" long and two at 7" long. For the bottom, they should be 2" wide and one at 17" and two at 7.5" long. Sew 1/2" seams on the short edges of all these pieces. The long piece goes centered and the other two go 3" to the sides of it. The bottom pieces are placed on the right side of the quilt piece right side down and even with the edge, then sewn along the top edge. The piece is then folded over and folded again for a 1/2" seam at the bottom. There should be room all around for the 1" seam for the quilt.
Draw cord tube at the bottom when sewn. Dart already in place
For the top, put them right side up aligned with the edge, fold over the lower edge for a seam and sew it down. The other side will be sewn into the edge, but could be sewn down now if desired.
Draw cord tube at the top. Dart already in place.
Sew the darts by folding the right side together at the center of where the darts should be, then sew in from the edge 1" from the fold for a length of 1" at the bottom and 2" at the top and sides. At top and bottom, the darts go between the cord tubes. At the sides, they go at the flat edges on the diagonal sides. After shortening the sides, flatten the extra fabric so that half is on either side of the seam and sew along the bottom to strengthen it. Darts at the top and bottom are shown above. The distance between the cord tubes is now 1".
After cutting the inside piece from the black, there is a strip 6" wide and flared at one end. Cut this where it starts to flare again for the bottom and cut a second 6" wide strip the same length. Fold these in half, right side in, and sew the short edges with a 1/2" seam. Turn them right side out and sew along the length. This can be a very crude and light weight seam. The end seam won't still be quite at the end on the flared side when finished, but this is okay.
One thing you see for women's sleeping bags is that they often have more insulation "in strategic locations where women get colder" or similar comments. Some come out and say the butt and feet areas. Since I can relate to that, I ordered a yard of 2.5oz Climashield to shore up these areas. Thru-hiker sent a yard of 5oz which, disconcertingly, was thicker than my two yards of 6oz. Since they didn't seem to think this needed fixing, I was stuck pulling the stuff in half which is probably not a good idea. Anyway, with the lighter insulation, cut a strip 19" wide for the middle and 14" wide for the foot. The foot piece goes 7" above the bottom, below this the insulation will get squeezed when the foot is cinched up and will be seam. Both should be the right shape for the quilt in that location. Sew them down along the long edges, but leave a few inches free at the sides. Newspaper strips can be used to keep the sewing machine from catching on the insulation fibers, then easily removed along the perforation.
Insulation pinned and ready to be sewn along the newspaper.
Cut the heavy insulation to the size of the inside piece or even a little bigger. Luckily, mine was a few inches longer than ordered since I need 74". Put that aside and put the front and back together with the long strips of black nylon along the edges, then sew up the sides with 1" seams. The nylon strips go from the top, but not in the 1" seam, down the edge until they stop and point inward. The flared side goes at the top. I made sure the odd seam was facing away from the inside piece. The sides come out evenly with the darts in place. I folded back the insulation strips so that they were not in the side seams. Add the insulation and make sure the draw cord tubes aren't folded up strangely, then pin it and sew across the top with another 1" seam. It is now quilted at the top but not along the sides.
Turn the quilt right side out. The empty nylon pieces now stick out. Pin the insulation 1" in for quilting along the sides. This turned out to be a rather large headache. The rationale for not doing the sides like the top is that they will get tucked under between me and the mat and might be more uncomfortable if doubled. Pin the insulation at the bottom, then close up the bottom by hand. Sew around the edges and bottom to quilt the sides of the insulation, about 1" in. This should hit the lines from the darts.
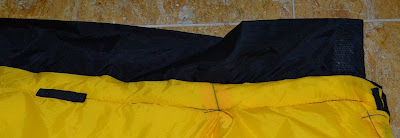
Add in the draw cord so it sticks out one of the holes in the tubes. Sew it down at the edge of the quilt on the top. Do similarly at the bottom, but leave ends long enough to tie together at the bottom. Add fasteners along the edge of the foot until the corner. People like to avoid zippers because they are heavy and usually use velcro. I don't like velcro that long, and split it up with some snaps. Snaps on their own proved not to be strong enough. Velcro is better, but needs something at the top to help it out. Hooks let go if there isn't a little bit of tension on them, so aren't reliable there. I ended up adding another tie to keep the velcro together. Also add plenty of velcro to the top of the black flaps to close the top. I sewed 2" bits of grosgrain (3/8" wide) on the outside along the quilting seam at 6" intervals to allow for tying the quilt to a mat.
The flared flap helps keep out drafts and has velcro (loops) sewn to the other side and the seam on this side. Grosgrain pieces laid flat and tacked down with thread at the ends allow tying the quilt to a mat, further cutting out drafts.
The smaller flap with loops sewn on this side. More grosgrain is tacked down in matching positions on this side.
Finally, cut matching large ovals, 14" x 12" roughly, from the remaining black nylon and sew around most of the edge, right sides together. Turn it right side out, stuff it, quilt it, and close it. This fills in the hole at the bottom and keeps the feet warmer by providing more insulation. Attach it near the quilting for the foot strip with ties at the corners and velcro at the edges.
The finished quilt. A flap and grosgrain to keep out drafts and velcro interspersed with snaps to close the bottom. Some of the draw cord is also visible at the bottom.
I tested it in combination with a R=4.1 mat first at Forbush Flat, where it wasn't cold enough to bother closing anything. I then trekked out to Sawmill Mountain on a night that wouldn't be stormy, but Frazier Park was predicted to hit freezing. I tucked in under tarp and quilt wearing my long johns. I had some cold along the edges until I tied them to the mat in a couple places using the grosgrain loops and some string I brought to do that. My butt was still slightly cold even though the quilting showed the strip of extra insulation was well placed. Once that was taken care of, I slept very comfortably, waking up in the morning to find ice in the Platypus an inch thick. Since Enlightened Equipment(another excellent way to get a synthetic quilt, I expect)use 6oz for their 30°F quilt, this seems like a good performance.
I would still like a little more central insulation. Then again, the quilt was too hot most of the time for the last hike in the Sierras in July. Velcro doesn't try to attach to where it is not wanted, causing wear, as much on this one as the mock up, but it still grabs the strings.
Get link
Facebook
X
Pinterest
Email
Other Apps
Liked this? Interesting? Click the three bars at the top left for the menu to read more or subscribe!
I've made a second quilt for summer that is just about exactly 1 pound. I used very slightly modified pattern, shortening the darts by a half inch, because I was using thinner insulation. I got just about all my materials from DutchWare Gear. I used their Argon 67 on the inside and Argon 90 on the outside. (Had I used Argon 67 for both, it would have been under a pound.) I used 3.6 oz/yd^2 Climashield Apex for insulation. I used the other half of the 5 oz that was sent instead of 2.5 oz for extra rump warmth, but left off the feet one. Other things seem more helpful at my feet. (Without this extra insulation, weight would have been under a pound even with the same fabric. Unfortunately, I seem to sleep very cold in the rump and this is still the first place I want more insulation.) I went with Omni Tape for the closure at the bottom and didn't mess with any snaps. It usually doesn't close perfectly, but the snaps weren't so wonderful either. I left out the bottom piece meant to help close any hole. I think a nice pair of super light booties will do a better job at keeping feet toasty than the extra insulation or closure piece, especially for a summer weight object. I used a loop of cord and a cheap plastic button for closure at the top and the end of the Omni Tape. This is much better than any ties.
My quilts are now paired with a 12 oz women's Thermarest NeoAir with R=3.9. I find this to be much colder than the old Big Agnes with R=4.1 unless there is some insulation between me and it. This is a bit of a problem with a quilt. Unfortunately, the Big Agnes has pinholes everywhere, so I can't just go back.
I expected this quilt to do well down to 45°F or 40°F. Results in the field for the new summer quilt seem to match that. Also, when wearing my puffy jacket and puffy pants under it in freezing weather with frost forming all around usually leaves me sweating. Since I love to have my puffy pants anyway, the summer quilt has been getting very preferential treatment even in the shoulder seasons.
I really don't like tossing the water filter and whatever else needs to be kept warm into the quilt, but on those very cold days it must be done to protect the filter from freezing. I should figure out where I can stand having the filter and sew in a pocket for it. As long as it bugs me, I keep pushing when I can leave it somewhat sheltered in the pack. Some day that might get me.
Little River State Beach, Trinidad State Beach, Sue-meg State Park, Humboldt Lagoons State Park Redwood National Park, Prairie Creek Redwoods State Park, Del Norte Coast Redwoods State Park Introduction The California Coastal Trail (CCT) is approximately 1200 miles of interconnected public trail following the coast from Mexico to Oregon. Or at least that's the dream. Currently, the trail is about 60% complete. In more populous areas, it often takes the form of boardwalks and multi-use paths marked by the swirl of blue wave crest. In rural areas, it may be pushed to the beach when that is usable, or to the nearest public route when that is not. The crest for the CCT marks a coastal access trail at the Lost Coast Headlands. There are thoughts of a route beside the ocean, but the primary route is substantially inland along Mattole Road for now. The beach becomes impassible in several places south of here and above the high tide mark is private property. The hiking trail rout...
Six Rivers National Forest DAY 1 | DAY 2 (map link) Bluff Creek Historic Trail gets my attention as I zoom by because it is clearly signed to be visible from the road and the trail is obviously used and in good shape. Also, why is "Historic" stuck in there? (Besides the obvious, the Forest Service simply says, "Gateway to Bigfoot Country" , which doesn't seem particularly unique along the Bigfoot Scenic Byway.) It doesn't get my attention when I'm looking at a map because it just offers about 1.5 miles of connecting the highway to Slate Creek Road, a paved road that leaves the highway a short distance northeast of the trail. However, further along in the same direction and connected by an unimproved road is "Wright Place (site)" which sits next to Bluff Creek. The trail is numbered, the road is not. While it is tempting to think that an old road is bigger and therefore more likely to be passable, it doesn't really work out that wa...
Uncompahgre National Forest (map link) The Forest Service seems to be uncertain if it is Lake Hope or Hope Lake, but more certain that it is the Hope Lake Trail. It consistently marks the road up to the trailhead as a 4x4 road, so I parked in a turnout at the bottom and started up, getting increasingly grumpy about how it is a rather good road with a loose rock here or there. I chatted with some campers about how it was probably great all the way up, but they'd gotten to their rather brilliantly picturesque site and been sufficiently mesmerized by it not to continue on. Talking with them got me sufficiently emboldened to actually stick out my thumb at the truck that came by as I finished the chat. When you're going 5 MPH anyway, it's easy to stop, and he did. Greg was going for the hike too and actually wouldn't mind having a buddy. The road promptly turned to something it wouldn't be wise to try the Scion on. With good judgement, I probably could make it, but...
Samoa Dunes State Recreation Area Click for map. I decided I would go and visit Humboldt Bay's first lighthouse. This one was set on the North Spit and was soon deemed too low, which prompted the building of a replacement up on Table Bluff . I aimed at it once before and didn't quite make it. Then I wanted to meander over to the wreck of the Milwaukee at low tide. That was only expected to be -0.4 feet and it really needs to be -2 feet (which happens in the summer) to see everything above the sand. I figured it sticks up a bit and I would see something. It isn't exactly the hills I need, but there's some sand dunes. You get to go all over them. Be aware, you are sharing them with OHVs, but it is pretty common for people to walk them as well. I followed the signs for the staging area on Bunker Road and found plenty of parking, picnicking, and why it's called Bunker Road. On the south side of the parking area is a sign marking the Samoa Dunes Wetland Trail. It...


Comments
My quilts are now paired with a 12 oz women's Thermarest NeoAir with R=3.9. I find this to be much colder than the old Big Agnes with R=4.1 unless there is some insulation between me and it. This is a bit of a problem with a quilt. Unfortunately, the Big Agnes has pinholes everywhere, so I can't just go back.
I expected this quilt to do well down to 45°F or 40°F. Results in the field for the new summer quilt seem to match that. Also, when wearing my puffy jacket and puffy pants under it in freezing weather with frost forming all around usually leaves me sweating. Since I love to have my puffy pants anyway, the summer quilt has been getting very preferential treatment even in the shoulder seasons.
So to do: Inside pocket for water filter.