If the Map's Wrong, Fix It!
The map in question is, of course, OpenStreetMap. While not explicitly setting out to do this, they've created the Wikipedia of maps and you probably use it even if you don't know it. It's on AllTrails and Strava and behind Gaia Topo and MapBuilder on Caltopo. If any of those have an error, you can fix it.
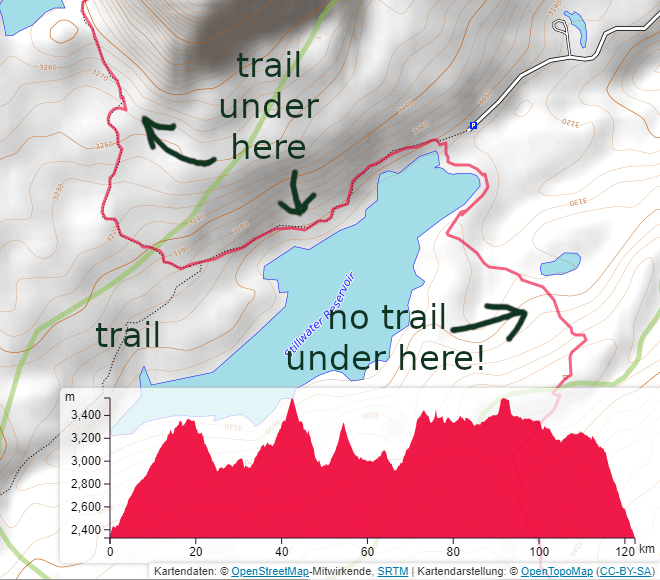
It's not just on the internet. This is also the one electronic map I carry with me, offline, that I know it will cover the place I am. When I need a library, post office, grocery store, gas station, I can search and find it even if I haven't got any usable cell signal. The roads are (generally) there. The buildings are (generally) there and marked. Unfortunately, trails are a little less reliable, at least in the USA. It's extensive and detailed in western Europe, having started in the UK and been very much embraced by Germans. North America hasn't got the same density of mappers. We're still doing better than in Africa and South America. More important is the potential. No map is perfect, but this one may have the greatest potential for all of us.
You can report errors anonymously. If you have an account, you can upload tracks as either "public" or "identifiable" and other people can use that as information for editing. However, especially in most of the United States, it's really a case that if you want it done, you've got to do it yourself.
The least you can do
Take no value judgement from this heading! The least you can do is also the most important! In this context, that is: draw the trails on the map.First you'll need to be logged in to edit the map, so create an account on OpenStreetMap.org if you don't have one. Click that link and follow the instructions. You can fill out your profile information if you like. Go through the walkthrough. It's short, particularly in comparison to the time it takes to map things, and it'll point out the details I forget to mention. Then move about the map to where you want to change things and click "edit" to start editing. If you've uploaded a track, it has an "edit" link you can use. This will bring up iD, the default editor. It requires no installation, yet is quite well done and responsive.
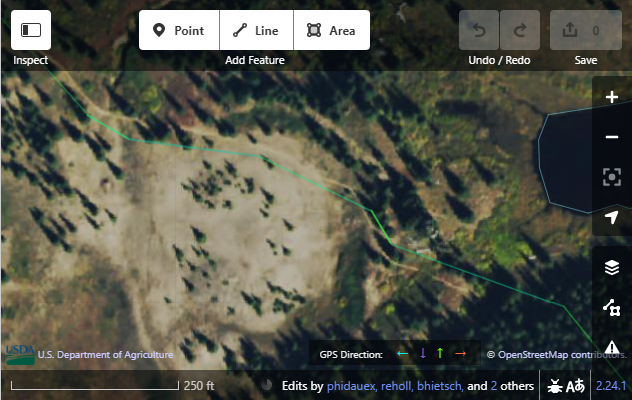
Now gather your sources. There is a button on the right showing three stacked squares that brings up background options. (Alternatively, just press "b" to get the options menu.) Click this and select a background. You can find imagery, USGS topographic maps, USFS topographic maps, and more as possible backgrounds. You can add overlays like GPS traces uploaded to OpenStreetMap or Forest Service Roads. I usually go for an imagery like Esri World (Clarity) and turn on the GPS traces. I refer to USGS and USFS maps, but these are maps that often need correcting too. Keep in mind that the goal is to map the truth of what is on the ground and that copying other maps is explicitly discouraged and sometimes illegal due to licensing.
* One rather useful reference layer you don't find in iD is the Strava global heat map, but it can be used. One method is to edit in Strava-iD, a fork of the default iD editor. This works a little differently from the standard iD. The heat map is not as detailed as you can get if you have a Strava account. If you have a Strava account, you can use the tile server link instructions here to get it as a custom background in iD. It is directed at users of a different editor, so you have to be somewhat sophisticated to use it. The page states you need a paid account, but I have not found that to be the case.
Fix an existing trail
If a trail is already on the map, you can change it. The editor should be pretty self explanatory. (And you did the walkthrough, right?) You must be at a close enough zoom to see what you are doing. Select the line and then select a specific node along it to move that node. Add to either end by selecting the line, then right click on an end and select add. Add nodes in the middle by clicking on the arrow at the middle between nodes. Delete nodes by selecting the node and pressing delete or by dropping it on a nearby node.Add a trail
If the trail isn't on the map, you'll need to draw it. There is no way to upload a GPS track as a trail because GPS tracks aren't accurate enough. You can use it as a source to help draw the trail. Zoom in close enough to edit and click "line" at the top to add the line that will be the trail on the map. When done drawing, click again on last node to stop drawing.You need to add tags that specify the line is a trail. While the line is selected, pick the feature type in the left pane. For USFS trails, you generally want to select "path" although "foot path" may be tempting. Generally trails outside of wilderness areas are meant to be used by foot, horse, and bike traffic while trails inside wilderness areas are used by foot and horse. It's inappropriate to claim these entirely for foot traffic. Generally, "foot path" and "bike path" and such are used for more developed trails than found on USFS and BLM lands.
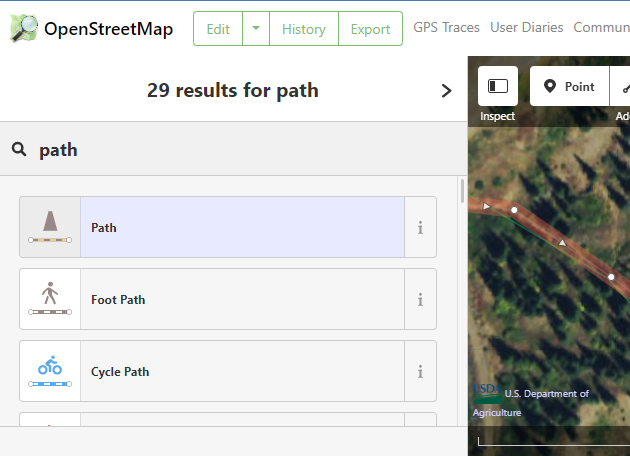
There is now a line with the single tag "highway=path". This is the minimum to distinguish the line that is a trail from the myriad of other things that might be mapped, like a road, natural ridge line, political land boundary, etc. Everything else can be assumed, even if that is not ideal.
Work through the issues
There's probably going to be some issues displaying once you've got a trail drawn. Some are warning and some outright errors. Typical errors/warnings are: crossing paths not connected, crossing streams, path disconnected. Routing is built on connections, so they're very important. Trails should connect to the other trails and roads on the map. If paths cross without connecting, you can generally just click "connect paths" and be done with it. It's nice to mark larger stream crossings with fords or bridges, but this section is about the minimum and that can be ignored. For disconnected paths, just make sure the end goes all the way to another path or road. One common error is connecting paths to the sides of parking areas. Drag them all the way over to the road.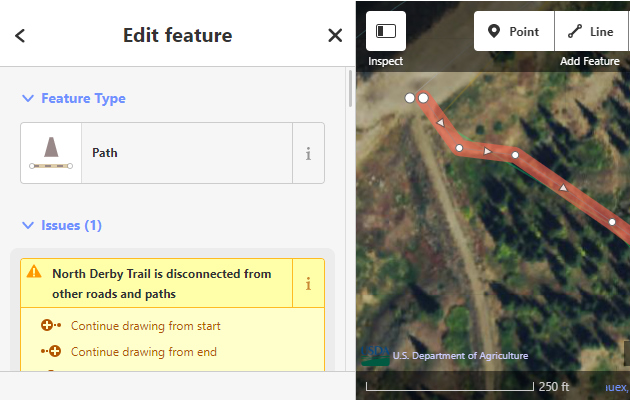
Upload the changes
Once there's no more issues, press "save" in the upper right. Describe what changes you have made. There's not a lot of space, but there shouldn't be too much to say. You want to try to keep sets of changes small and localized. If you are doing a lot, break it up into logical pieces. Fill in the "sources" with the imagery you used, if there was GPS, if it relies on your local knowledge. Review the issues once more and complete the upload.Congratulations, you have edited the map! And it will tell you so.
Now, if you want to be sure it is a richly detailed and useful map, keep on going. You don't have to do all of it! I'm trying to make this hierarchical so you can go as far along with this as you like, then quit.
Fill in important details
After drawing a trail and marking it as a path, everything else can be assumed, but those assumptions may not be correct. For instance, it's now assuming you can ride your bike there even if the trail is deep within a Congressionally designated Wilderness. Oh, and most renderers assume the trail is in "excellent" condition. Click on the trail again and there's more in the left hand panel that is good to fill in.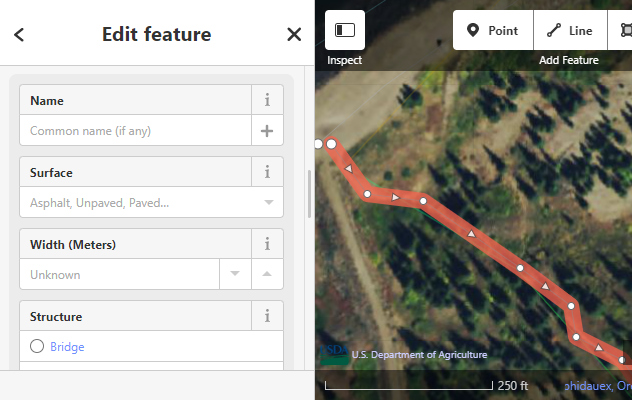
Basic trail information
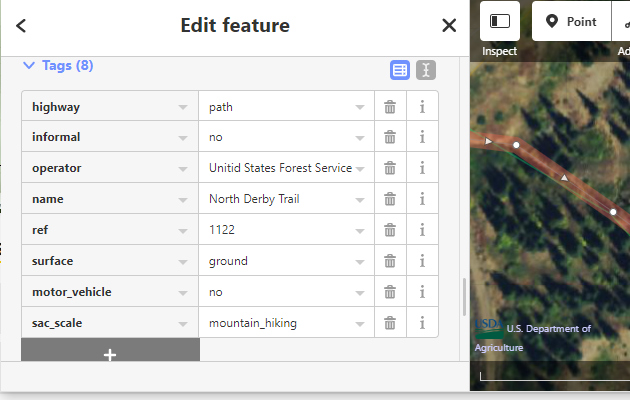
Name: Fill in the name usually used for the trail. Include "Trail" on the end if it is part of the name and do not abbreviate. The renderer can abbreviate if desired, but may not guess correctly to expand an abbreviation.Of course, there can be complications to the name. If this is different from an official name, scroll down to "tags", press the "+", and put "official_name" in the first box (without quotes) and put the name in the second box. If there is a common name that isn't all that universal, the official name might be put in name and the lesser used common name in "common_name". There are also ways to indicate the name in multiple languages. Keep in mind that one can search for and access these even if they are not rendered, so it's all good to have.
Some trails share tread for short or long segments and therefore have two names. This is particularly common with long trails like the Pacific Crest Trail or Colorado Trail. These trails often follow trails that existed long before them. Maps by the USFS deal with this in inconsistent ways. Sometimes the old name is replaced. Sometimes the names are hyphenated. Sometimes one name is placed above the trail and the other below. Colors are used to specify National Scenic Trail routes. The right way? Um, yes, well. There are a couple different options. Probably the best is to put both names separated by a semicolon. (name=Highline Trail;Colorado Trail) This is a standard way to put multiple values in where they are allowed and they are allowed on names. Renderers will usually place both names on the trail separated by whatever standard mark they like. Some will only show the first name. The USFS usually puts the long trail second. Another way is using other name fields such as "official_name" and "alt_name" and "common_name", however these are less likely to be rendered. [Edited 26 Feb 2023]
Reference Code: This is not offered in the standard fields, but scroll down to "Add field:" and you can find "Reference Code" or just scroll down to "tags" and type in "ref" in the first box. Put the reference number and just the reference number here. You'll see people have put "TR" or "FS" in front of these, but this isn't part of the reference nor part of what is seen on signs. One is trying to map the "ground truth" or what is actually there, so it should only be in the ref if it is part of the signs.
If you find yourself putting the reference number as the name, you might want to search on that number and a few other words (like the forest name if it's in a USFS) to try to find an actual name. I have sometimes found forest employees just guessing names as they see fit and coming up with three different names for the same trail in three different publications, but usually there is a real name somewhere. Alternatively, try to find it on the map included with recreation site pages. Some renderers actually pick up both the name and reference to show, others will use the reference if there is no name, so you don't really need to put it as a name if you can't find one.
Allowed Access: This is the place to note that bicycles aren't allowed if you're inside the Wilderness by setting "bicycles=no". For when access is allowed, there are multiple options. "Designated" means that the path is maintained for that type of access. This is a stronger version of "yes" which simply means you may go there. Usually these just get set to "yes", which is fine. "Permissive" means only while permission is granted and is likely to be rare.
Got a trail that allows motorcycles? First, check the Motor Vehicles Use Map or similar to be sure it does. If it does, then you can go to tags and add "motorcycle" as "yes". There are similar for ATV if they are allowed. If a trail allows ATV for a distance, then only motorcycles, it needs to get split into the two pieces where the rules change in order to show that.
There is a trail that is either private or otherwise closed to the general public? Then set "access" to "private" or "no". It actually is important to map these. An unmarked trail is an invitation to a wrong turn. People will generally choose to follow the rules if both are marked. Renderers generally put red "x"s on this sort of thing.
Informal: Definitely mark a path as informal if it is a "use trail" or "social trail". Pick out "informal" from "Add field:" and click it so it says "yes".
You can mark something as official, too, by making "informal" "no" and indicating the land manager that maintains the trail (not just the land around the trail) with an "operator" tag set to the formal name of the land manager.
Physical trail properties
Trail Visibility: A very important one in my opinion, but you'll find it in the "Add field:" zone. When they're particularly good, mark them as "excellent" even though renderers tend to assume it. That really shouldn't be the assumption. There's explained levels all the way down to "no". It is possible to split a trail up at every change in visibility, but not expected and probably not the best plan. Usually one can be very informative for a whole section between junctions, or just major junctions. Set to things like "intermediate" doesn't mean all of it is hard to find, just that there are sections that are hard to find.The USFS has a class rating for their trails based on how much work has gone into defining them starting at 1 for little work to 5 for paved paths. Based on their description, a class 1 trail is likely to be "trail_visibility=intermediate" at best. Class 2 trail might be intermediate or good. Class 3 trail could be good or excellent. Class 4 and 5 should be excellent. These classes are marked on trails downloaded from the geodata clearinghouse, but I'm not sure where else.
Hiking Difficulty: This is the SAC scale and it escalates quickly. "T1: Hiking" is generally easy, fairly flat stuff. "T2: Mountain Hiking" is for pretty hilly hiking. "T3: Demanding Mountain Hiking" is for really steep hiking with spots of exposure. "T4: Alpine Hiking" is where the hands come out to help you climb. I'm not sure how to judge an eastern trail with ladders as part of the trail, but few western trails do this to you. (For the eastern trails, you probably mark the ladders just as you would a bridge, then judge the rest of the trail.) Official trails shouldn't be T4 or above unless something special is happening. When using the map, if you see T4-T6, you should probably learn more about it than can be simply shown on a map before using it.
Surface: Generally, "ground" is it. You can be more specific with "sand" or "compacted" or "dirt" or "gravel" if that is the primary character. It's more important to mark this if it's "paved".
Smoothness: This is described in terms of the vehicle needed to go along a road, perfect enough for a racing bike or so rough it needs an ATV. I'm not entirely sure how to relate it to trails I'm walking, but the concept is certainly useful and there are some enthusiastic supporters of its use on trails.
Width (Meters): Another one of lesser import to me. Don't worry, you can treat that as yards, too. It's not that exact on trails. (Perhaps "est_width" should be used instead.) If you are marking bike trails, this is good to distinguish single track from double track, I suppose. If you are marking ADA trails, this is likely specified somewhere and a bit more important.
Incline: I've never bothered with this one, but if you download USFS trails from the geodata clearinghouse, they are broken up into pieces and mark incline ranges for each. It's certainly not a bad one to have and more specifically informative than SAC difficulty.
MTB:scale: Another difficulty rating that might be good to add if bikes are allowed.
Trailblazed: Set to "yes" for a segment if there are frequent markings such as snow poles along that segment of trail.
Signs and amenities
You don't have to stop at just marking the trails. Signs at intersections make good landmarks for navigation, so it's nice to know there's going to be one. I usually just select the node at the intersection, then type "guidepost" in the search and click on it when it comes up. It's now tagged as a guidepost! And it does show up on my map. You can also do it right and select "point" at the top and pluck it down exactly where the sign is, then tag that as a guidepost. The USFS expects its signs to be within 25 feet of an intersection (if I recall correctly) which is just enough room to have two trees and a bush between the intersection and the sign. Marking a sign position more exactly can help in finding it.
You can mark trailheads. You can mark the area where there is parking. You can mark the toilet. You can mark picnic tables, including if they are covered. You can mark benches. You can mark information boards, the ones at the starts of trails or the ones that are part of interpretive trails. You can mark gates. Um, I haven't figured out how to mark a trail register or corrals.
You can mark springs including how much they produce and if they are plumbed and if they are seasonal and what that season might be. These extra details aren't generally rendered on the map, but they are accessible data using POI (points of interest) files or just making the map clickable. You can mark campgrounds and backcountry campsites and include fee information. Um, I haven't figured out how to mark no camping areas as found around overcamped lakes.
You can mark ruins and graves and historic markers. Survey markers and beacons. Whatever cool thing that might be of interest probably has a way of being marked. The iD editor is really good at finding these when you type into the search. Um, but I didn't quite figure out how to mark sighting tubes.
You can even mark cairns and other trail markers. You know, to help people find an otherwise rather difficult trail. "Even if you can't see the trail, you should see a marker over here."
Roads
To focus on the USFS, they have three levels of road distinguished by how they sign the route (reference) number. Primary roads are signed with a large, trapezoidal sign with a number, usually of 1-2 digits. These are meant to be suitable for passenger cars. (Or at least that is the standard, but Six Rivers and Trinity put these routes across 4x4 roads.) Secondary roads are signed with a horizontal rectangle and a 4 digit number or by township and a number (i.e. 3N15). These may be rough, but are also meant to be good enough for the family sedan (but I wouldn't bet on it). Then there are low standard routes which have the same kind of numbering, but are signed with a vertical rectangle. These are maintained for high clearance vehicles, if they are maintained at all.Low standard roads
This last are the easiest to determine the type. They are all track roads, found under "minor roads". These have a few particularly useful fields along with the normal.Name: Same as with trails.
Reference Number: Use "FR " and the route number. While the reference is meant to be just the naked number, the Americans in the group have generally agreed to put some indication of the road system into the reference number. This is separated by a space, not a hyphen.
Access: Pretty much the same, but now motor vehicles might be allowed. Still a good idea to check the Motor Vehicle Use Map. A lot of roads on the FS Topo are actually decommissioned. (There's a lifecycle tag for that.)
Surface: I often see "unpaved" used, but "ground" is just as good here as on the trail. Perhaps even better as it helps specify that the road is unimproved. (Improved has a very specific meaning which involves culverts and bringing in harder materials.)
Track Type: From solid to soft depending on the type of surface it crosses. (This is getting used on trails, too.)
Smoothness: Quite important here. Most things are going to be "bad" at best, but this isn't so bad. It's actually good enough for the little car. Next is "very_bad" which is suitable for the Subaru or other AWD sort of vehicle. Set to "horrible" if you really should have a proper high clearance 4x4. The pull down menu on iD stops there, but the scale does not. Go to the tags and type in "very_horrible" if you really ought to get out the ATV for it. There's "impassible" for when it just isn't possible. There are lifecycle tags that might be more appropriate if it's the last.
Secondary roads
Typically these should be unclassified, but may be track roads. Do not mark it as "road", which is just a placeholder and could be absolutely anything. These roads can have the same tags as above with some caveats.Ref: Again use "FR " and the route number.
Surface: Mark at least paved or unpaved since once in a while they are paved.
Track Type: This was meant to be specific to track roads, however it is often used on other sorts of unpaved roads and even trails.
Surface: These roads are often improved, which involves putting in culverts and bringing in materials to build up a resilient road bed even if they are still "unpaved". It is more specific to set them to "compacted" or "gravel" or "fine_gravel" in these cases.
Primary roads
These are probably also "unclassified" roads. If they are a major route between population centers, they might be a "tertiary" road or something else from the "major roads" category.Reference Number: For these, use "NF " with the route number. For roads that are also numbered with the secondary number system, use a semi-colon to separate the two references. Put this one first since it's the more important and some renderers only show the first.
County roads
These can be lovely or horrible tracks depending on the county. Within USFS lands, they seem to often be particularly good roads, but I've seen one decay from easy for Scion+trailer to a jeep track in 4 miles.Reference Number:Use "CR " in front of the county's number.
Network: Optional, but "network" can be set to "US:state:county" where the state is the two letter postal code and the county is spelled out.
Likely these should be part of a route relation. I would go with whatever the Americana project, who are producing a beautiful Rand McNally like map, like best.
[Roads edited 15 Jun 2023]
Extra credit: Route Relations
Often it's useful to join together the many segments of trail into a route relation of the type hiking. These are used extensively in Europe. In the United States, they are generally only applied to longer trails. It serves as a highlight for these routes the way my renderer works. When I zoom out far enough, I see a few interstates and the Continental Divide Trail running up the middle of the country. One place to explore these is at Waymarked Trails.Since it's a collection of purpose built trails and already existing trails, I marked the full Arcata Ridge Trail as a relation. It was a perfect fit for such a thing. I should tackle the California Coastal Trail, which isn't marked at time of writing. Perhaps I might go for the [South] Kelsey National Recreation Trail (which might have fallen from that designation?) or the Bigfoot Trail (depends on if it is desired by the maker/copyrighted/otherwise protected intellectual property).
Further Reading
There's a few more categories of tags I've not covered that can be found in this wiki page on hiking tags.There's more good overview on the wiki page for the US Trail Access Project and in this announcement for it.
And now it's time for my annual pondering if I can replace my Google maps that head each post with an OpenStreetMap. Google used to provide an easy way to get the code to embed a map. That stopped some 6 or 8 years ago. Now I'm basically hacking them to have my maps. (I just recycle old code and edit values as appropriate.) I'm doing it to a company that stopped even giving lip service to its "don't be evil" slogan, so it's hard to feel bad. But still. Here is the map (using the uMap service) from the last hike (well, it's anonymous and editable, but that's what I made it at writing) in an OpenStreetMap version:
Feeling overwhelmed? Please don't! You don't have to do all of that! Go back up to "The least you can do" and get as far as you are willing/comfortable/happy to do. Every little bit helps! Now I have a trail I need to actually add in the Flat Tops Wilderness because it'll eat at me if I don't.
Liked this? Interesting? Click the three bars at the top left for the menu to read more or subscribe!


Comments